O-YUM-G

  • Blog
  • What's For TV
  • Gallery
  • About
  • Index

Blueberry Custard Streusel Pie

July 11, 2016 by Libby Harrison in desserts

It's berry season and one of my favorites because of all the delicious ways you can use berries.  I recently went blueberry picking and came home with a big bucket of blueberries.  I ate some, froze a lot and baked with the rest!  

I love making pie and what's better in the summertime than a blueberry pie?  So I did a little research and settled on a blueberry custard streusel pie.  I liked the idea of a custard-based pie as it would add a little more stability and flavor to the filling.  And who doesn't love a crunchy, nutty, streusel?  This was a delicious pie and a recipe that I'll keep on file for the next time I have a bucket of berries!  The only change I would make is to blind bake the pie crust first to ensure a fully baked bottom (mine was slightly underdone).

Blueberry Custard Streusel Pie

adapted from The Girl Who Ate Everything

Crust

  • 1 cup flour
  • 1/2 salt
  • 1/3 cup shortening
  • 2 to 3 Tbsp cold water

Filling

  • 1 cup sour cream
  • 3/4 cup sugar
  • 1 egg
  • 2 Tbsp flour
  • 2 tsp vanilla
  • 1/4 tsp salt
  • 2 1/2 cups fresh blueberries

Streusel Topping

  • 1/2 cup brown sugar
  • 1/3 cup flour
  • 1/4 cup butter, softened
  • 1/2 cup pecans, toasted & chopped

To make the crust, mix flour and salt in a large bowl.  Add shortening and using fingers, work the shortening into the flour until resembles pea-sized crumbles.  Add enough water to make the dough just come together.  Turn out onto a floured surface and roll about 1/8th inch thick. Transfer to a pie plate and crimp crust as desired.  Line the pie crust with a piece of foil and add ceramic pie weights or dried beans (these help keep the crust from creating bubbles and the sides from sliding down). Blind bake in a 425 degree oven on the middle rack for 15-20 minutes or until the crust is just turning golden.  Remove the foil and weights and return crust for about 5 minutes or until the bottom of the crust looks dry.  Remove from oven and let cool.  Reduce oven temperature to 400 degrees.

While the crust is cooling, prepare the filling.  In a large bowl, whisk together sour cream, sugar, egg, flour, vanilla and salt.  Gently fold in the blue berries.  Pour into the crust shell.  Cover the edges of the crust with foil (to prevent burning) and bake for 25 minutes.

While the filling is cooking, prepare the streusel.  In a small bowl, mix together brown sugar and flour.  Work in softened better until you have coarse crumbles.  Add in the chopped pecans.  After the filling has baked for 25 minutes, top the pie with the streusel topping and return to oven for an additional 15-20 minutes or until the pie is set and the streusel is browned.

Let the pie cool for at least 15-20 minutes and serve warm or refrigerated and serve chilled.  Enjoy!


BONUS!!  

If you happen to have lots of blueberries like I did and want another pie-in-the-sky idea...here's another pie recipe!  This recipe was featured on the cover of Southern Living a few years ago and it looked so tempting, I had to make it.  The secret ingredients?  Honey and balsamic vinegar!  Though I would consider adding a splash or two more of the vinegar, as once the pie was baked, you couldn't really taste the balsamic - but you could taste that it was a tasty pie!  And I can't resist the look of a beautiful lattice crust.  Find the recipe here.
July 11, 2016 /Libby Harrison
pie, pastry, berries, holiday
desserts
Comment

Baking Club Adventure: Cookie Exchange!

May 22, 2016 by Libby Harrison in desserts

I realize it's May and we're talking about Christmas cookies - but the way the weather is behaving, it might as well be December! (Christmas Eve was MUCH warmer than it is today!)

One of the things the members of the baking club told me when I first joined, was that they did an epic Christmas cookie exchange every December.  Each member would make four dozen of four different kinds of cookies...that's 16 dozen cookies...per person!! Needless to say, I was excited and intrigued and started making my list of cookies I wanted to make last June (hey, it's never too early to think about Christmas!).

When December finally came, I took off a day of work just so I could focus on baking cookies - and it was a delightful vacation day, well spent. The day started with an 8:30am showing of the new Star Wars movie, a stop by one of my favorite Mediterranean restaurants for lunch to go, and then an afternoon in my kitchen with Christmas music playing in the background.  Heaven.

Keep reading for all of our cookies and some recipes!


LIBBY - Spritz Cookies, Pecan Pie Bars, Rosemary-Lemon Shortbread, Italian Seed Cookies & Cheddar Cheese Wafers

In the end, I made 5 different kinds of cookies - a mix of classics that I used to make with my Mom and some new ones.  I even included a savory "cookie" for variety.   Here are some of the recipes I made:

PECAN PIE BARS

I love pecans but am generally not the biggest fan of pecan pie.  The ratio of crust to pecans to sweet, gooey filling is all off for me.  There ends up being way too much of the gooey stuff and I can really only take a bite or two before it's too much.  But these bars are a game-changer. A thick, slightly sweet crust is the base for the perfect blend of filling and pecans.  There's just the right amount of each component - and I dare you to eat just one!

Crust:

  • 3 cups flour
  • 1/2 cup sugar
  • 1 cup butter or margarine
  • 1/2 tsp. salt

Filling:

  • 4 eggs, slightly beaten
  • 1 1/2 cups Karo light corn syrup
  • 1 1/2 cups sugar
  • 3 Tbsp butter or margarine
  • 1 1/2 tsp vanilla
  • 2 1/2 cups pecans, toasted and chopped

Grease bottom and sides of a 10x15x1 inch baking pan (a half sheet or jelly roll pan will also work fine).

Prepare crust: In large bowl with mixer at medium speed, beat flour, sugar, butter and salt until mixture resembles coarse crumbs. Press firmly and evenly into the pan.  Bake in 350 oven for 20 minutes.

While crust is baking, prepare filling: In large bowl, stir eggs, corn syrup, sugar, butter and vanilla until blended.  Stir in pecans.  Spread evenly over hot crust. Return to 350 oven and bake for 25 minutes or until set.

Cool completely before cutting.

ROSEMARY-LEMON SHORTBREAD

These cookies are a variation on a shortbread recipe my mom received from a friend back when we were living in Germany in the 1980s. It called for rice flour before that ever became a common ingredient you easily find in the regular grocery store.  We often would replace the rice flour for another cup of regular flour - which never affected how quickly they were eaten! Since the shortbread is cut into 1" squares - it makes for a lot of cookies (up to 16 dozen) - and perfect for a cookie exchange or to give as gifts! 

  • 1 pound (4 sticks) butter, softened
  • 1 cup sugar
  • 3 cups all-purpose flour
  • 1 cup rice flour
  • 3 Tbsp fresh rosemary, chopped
  • 1 Tbsp fresh lemon rind
  • Sanding sugars (optional)

In the bowl of a mixer, cream butter and add sugar.  Slowly add in flours and then the rosemary and lemon rind. Pat in a half sheet or jelly roll pan.  Pre-cut the shortbread into 1" squares and prick each square with the tines of a fork.  Bake at 325 for 40-50 minutes until light golden brown.  Sprinkle with sugars (I either use clear sparkling sugars or seasonal red & green sanding sugars.)  While still warm, re-cut and prick the squares.

Variations:  Instead of rosemary & lemon add: 2 tsp cinnamon or 1 cup mini chocolate chips or 1 cup roasted pistachios, finely chopped.

CHEDDAR CHEESE WAFERS

Cheese wafers are a classic Southern staple, especially at the holidays.  Whenever I'd travel to Louisiana to visit family, I could always anticipate finding a plate of these at any one of my relative's homes.  It wasn't until my Mom moved to Tennessee that she discovered this variation on the cheese wafer, with the unexpected-but-delightful ingredient of...Rice Krispies!

  • 2 sticks butter or margarine
  • 2 cups sharp cheddar cheese, shredded (best if you hand-shred from a block)
  • 2 cups flour
  • 1/2 tsp salt
  • 1/2 tsp cayenne pepper
  • 2 cups Rice Krispies

In the bowl of a mixer, cream the butter and cheddar cheese.  Add flour, salt and cayenne and mix well.  Add in Rice Krispies and gently stir in until fully incorporated.  Shape the dough into small balls (about 1 tsp) and place on an ungreased cookie sheet.  Flatten each ball with a fork and bake at 350 for about 15 minutes.  These don't get brown - so be careful not to overbake.


GINA - Caramel Oat Lace Cookies, Hazelnut Kisses, Dulce de Lece Macaroons, Crunchy Almond Cookies & Triple Chocolate Drops (clockwise from top)

Caramel Oat Lace Cookies - via The Washington Post

These are a lovely cross between candy and a cookie, with hints of citrus and cardamom.  They look so fancy and elegant and would make for a perfect after-dinner treat, served with coffee or tea.

Hazelnut Kisses (Baci di Dama) - via The Washington Post

OMG - these were pretty much my favorite cookies of the whole bunch.  What's not to love with hazelnut shortbread cookies filled with homemade nutella?  While I gave away most of my cookie haul as gifts, I kept all of these for myself (sorry, not sorry!).

Dulce de Leche Macaroons - via The Washington Post

If you love the flavors of coconut and caramel - these cookies are for you!  They are an easy 5-ingredient cookie that come together in one bowl - and can be made in advance.

Crunchy Almond Cookies - via The Washington Post

These French cookies are dairy free and just four simple ingredients.  As a lover of anything almond flavored - these cookies weren't almond-y enough for me.  I would add a bit of almond extract to amp up the almond-ness of these cookies. 

Triple Chocolate Drops - via The New York Times

These cookies have it all: looks, taste and chocolate!  And not just one kind of chocolate...three! (technically four, if you count the semi-sweet chocolate shavings on top). The white chocolate glaze is really the shining star in this cookie - the smooth, creaminess of the glaze is the perfect pairing for a rich chocolate cookie base.


KLARE - Bullseye Chocolate Mint Cookies, Chocolate Raspberry Pinwheels, Ribbon Cookie & Orange Coconut Cookie (clockwise from top)

Klare got very creative in the kitchen with her cookies - making little tweaks here and there to make these cookies her own.  She also figure out how to be the most efficient with shaping and baking her cookies...all of these are slice and bake cookies.  It's amazing how different they all look - round logs, square logs, spirals and layers.  They're quite pretty and the flavors of each one are unique and so delicious.  The bullseye peppermint cookies taste like there's a peppermint patty hidden in the middle!


TONYA - Salted Dulce de Leche Thumbprints, Sicilian Almond Cookies, Chocolate Caramel Chews & Fruitcake Cookies (clockwise from top)

Salted Dulce de Leche Thumbprint Cookies - via Baked by an Introvert

These are just delicious...and dangerous!  It's much too easy to knock out four or five of these little one-bite cookies in the blink of an eye! The soft and tender shortbread cookie and the pool of ducle de leche with the sharpness of sea salt all make for a winning combination.

Sicilian Almond Cookies - via The Washington Post

Another call for almond lovers - these almond and cinnamon cookies get an extra dose of cinnamon when they're rolled in a cinnamon & sugar mixture right before baking. 

Chocolate Caramel Chews - via Rose Levy Beranbaum

These cookie bars have some of my favorite things layered one on top of another: crust, caramel, chocolate and nuts.  And they play together nicely in this cookie playground.  In a sea of round cookies, these triangle treats will surely stand out on any cookie platter!

Fruitcake Cookies - via Ina Garten

I think in the world of fruitcake, you're either a lover or a hater. I happen to fall in the latter camp - but my Mom LOVES her some fruitcake - so she was very excited to try these.  These cookies do require some advance planning - first you have to make your candied fruit mixture and let it sit overnight before you prepare the cookie.


So when the day was done, we sampled 18 different kinds of cookies.  I loved the diversity of flavors, ingredients and techniques but most of all enjoyed sharing this time with my fellow bakers.  So which ones are you going to put on your Christmas baking list for this year?  It's never too early to start planning...after all, Christmas is just 216 days away!!

May 22, 2016 /Libby Harrison
baking club, cookies, holiday
desserts
Comment

Baking Club Adventure: Gingerbread

March 19, 2016 by Libby Harrison in desserts

So, I realized it's March - and gingerbread is not exactly something you think about when it's springtime, but hey, I like to be unconventional every once in a while!  As I think back on our November baking club meeting - I think this was one of my favorite ones so far.  I had a lot of fun making my recipe (a gingerbread roll) and had even more fun tasting everyone else's creations!  They were so varied and the sweet and spicy flavor of ginger came through in different and unique ways. See below for all the pictures!

LIBBY - Gingerbread Roll Cake (via Roxana's Home Baking)

Gingerbread Roll Cake

Gingerbread Roll Cake

KLARE - Gingerbread Cinnamon Roll with Eggnog Glaze

At first Klare had me at cinnamon roll - then she dropped the eggnog bomb - and I was drooling. I think these were some of the best cinnamon rolls I have ever had - and the gingerbread flavor really brought them to another level.  I ate an entire cinnamon roll during baking club - and felt lucky enough to take another one home with me for breakfast the next day. Talk about O-YUM-G!

Gingerbread Cinnamon Rolls with Eggnog Glaze

Gingerbread Cinnamon Rolls with Eggnog Glaze

TONYA - Chocolate Gingerbread Loaf and Gingerbread Cake with Lemon Frosting

Tonya hosted us in her newly updated kitchen and was so excited to have a working kitchen again - she made two recipes! The first was a wonderfully moist and dense chocolate gingerbread loaf.  The flavors were pretty much equally chocolate and gingerbread and all around delicious! Her other dish was a tender gingerbread cake with lemon frosting. The ginger and lemon flavors really go well together.  I can see this cake as a great contribution to a potluck luncheon.

Chocolate Gingerbread Loaf

Chocolate Gingerbread Loaf

Gingerbread Cake with Lemon Frosting

Gingerbread Cake with Lemon Frosting

GINA - Gingerbread Pear Upside Down Cake & Gingerbread Muffins with Lemon Glaze

Gina brought a show-stopping gingerbread pear upside down cake - it was so beautiful and delicious, too!  There were a lot of flavor combinations I wouldn't have thought of but the spiciness of gingerbread was a perfect complement to the delicate and sweet flavor of the pears (and brown sugar and butter mixture didn't hurt either!).  Gina's other dish were some gingerbread muffins with a lemon glaze.  They were tasty and perfect for packing in your lunch on a cold winter's day (or really, any day).

Gingerbread Pear Upside Down Cake

Gingerbread Pear Upside Down Cake

Gingerbread Muffins with Lemon Glaze

Gingerbread Muffins with Lemon Glaze

March 19, 2016 /Libby Harrison
baking club, gingerbread
desserts
Comment

Churro Cream Puffs

March 19, 2016 by Libby Harrison in desserts

It's a rainy, soon-to-be-snowy, almost Spring kind of weekend.  So it's a perfect time to blog and make something that's been on my baking bucket list ever since I discovered The Great British Baking Show: pâte à choux (pronounced "PAHT-uh-shoo").  

I think I had always been intimidated by pâte à choux - mainly because of the fancy sounding name.  If you're wondering, "what the heck is pâte à choux?", it's a light, airy pastry dough that was first created in France and is used as the base for many popular treats: profiteroles (aka cream puffs), eclairs, croquembouches, beignets and churros (the last two are fried vs. baked).

What makes this dough unique compared to other baked goods, is that butter, water and flour are first cooked on the stove and the ball of dough then transferred to a mixer where you beat in eggs.  The dough is then piped onto a baking sheet and baked (you can pipe a variety of shapes).  While baking, the water evaporates, creating steam, which then causes them to puff!  It's a lot of fun to watch as they bake!  Once they're baked and cooled, you can fill them with a variety of fillings: whipping cream, pasty cream, custard or even ice cream!  These cream puffs really came together much faster and more easily than I had imagined.  

If you're looking for a dessert to really wow your guests - but come together in about the same time as making a cake or pan of brownies, these churro cream puffs are a "choux" in!

CHURRO CREAM PUFFS (adapted from Barbara Bakes)

Pâte à choux

  • 6 tablespoons, butter
  • 3/4 cup water
  • 1 Tbsp sugar
  • 1/4 tsp salt
  • 3/4 cup flour
  • 3 eggs
  • 2 Tbsp honey
  • 1 Tbsp sugar
  • 1 tsp cinnamon
  1. Preheat oven to 425 degrees.
  2. In a medium saucepan, bring butter, water, sugar and salt to a boil. Turn off heat and add the flour.  Mix until the dough is smooth and forms a ball.  Transfer dough to the bowl of a mixer and let cool for about 5 minutes.
  3. Beat the dough and add the eggs one at a time.  Beat until the mixture is smooth and glossy.
  4. Transfer the dough to a pastry bag fitted with a wide tip (at least 5/8" - can be plain or star tip). For standard-sized cream puffs, pipe dough into 1 1/2" rounds that are also 1 1/2" high. With a wet finger, smooth out and round the tops of each puff.
  5. Bake at 425 degrees for 5 minutes, then reduce temperature to 375 degrees and bake for 30 minutes.  They should be puffy and golden brown.  (They'll really start to puff at about the 15-20 minute mark.)  Turn the oven off - and let them cool in the oven for 10 minutes. Remove from the oven and let cool completely.
  6. In a small bowl, heat honey in the microwave for about 20 seconds.  Using a pastry brush, brush the honey over the tops and sides of the cream puff shells.  Combine the sugar and cinnamon and sprinkle over the top of each puff.  Bake the shells for 5 minutes in a 350 degree oven.  Cool completely before filling.

Cinnamon Whipped Cream

  • 1 1/2 cups heavy whipped cream
  • pinch of salt
  • 1/3 cup powdered sugar
  • 1 tsp cinnamon
  1. In a large bowl, whip cream and salt until soft peaks form.  Add in powdered sugar and cinnamon and whip until stiff peaks form.
  2. Transfer mixture into a piping bag fitting with medium round or star tip.
  3. Either cut each cream puff shell in half or with a paring knife, pierce an "X" on the side of each puff. Insert the pastry bag tip into the hole and fill each shell with the whipped cream.
  4. Serve immediately.

March 19, 2016 /Libby Harrison
pastry
desserts
Comment

Baking Club Adventure: Bread Pudding!

January 08, 2016 by Libby Harrison in desserts

At our September meeting, the subject of bread pudding came up since the pudding cake I chose to make for the September theme, was more like a bread pudding than a lava/pudding cake.  Tonya mentioned that she had never had bread pudding before - and so the rest of us decided that our next theme had to be bread pudding - so that she could finally have a taste of one of my most favorite desserts!  I can pretty much always be convinced to get dessert when eating out at restaurant, if bread pudding is on the menu.  It's such a delicious comfort food and a great way to use up any kind of bread you have left over.  

I've made bread pudding with French bread, challah, Irish soda bread...even Krispy Kremes! So if you ever have any leftover bread - don't throw it away - just put it into your freezer and pull it out for the next time you want to serve a crowd - for either dessert or brunch!  Bread pudding makes for an excellent breakfast! (Think of it as a fancy baked french toast.) So when you've got enough bread on hand, all you need is some milk or cream, eggs and vanilla to whip up a delicious batch of bread pudding!  There's even a simple ratio to keep in mind when putting together the egg custard in which the bread cubes are soaked: two parts milk to one part egg, plus sugar, vanilla and salt.  So for a regular 1-lb loaf of bread, you'll need 2 cups of milk, 4 eggs, 1/2 cup of sugar, 1 tsp vanilla and 1/4 tsp of salt.  From there, the variations are endless - you can add additional ingredients like nuts, chocolate or fresh or dried fruit! 

Note: Regarding the ratio above, remember that you have to use the same units of measure for your ingredients.  Two cups of milk to one egg is not the proper ratio (an egg isn't an equal unit of measure for milk).  Instead, you'd have to measure your eggs by weight or volume to get the proper ratio. For standard large eggs, 1 egg = 2 ounces.  So for this ratio, 2 cups of milk (16oz) and 4 eggs (8oz) fits the 2:1 ratio.

The Baking Club had a wide range of breads and flavors added to our bread puddings - some came with sauces, some were served plain.  All were delicious!


LIBBY: Apple and Maple Bread Pudding (via Bon Appetit)

I had just returned from vacation in Montreal & Quebec - so had maple on the mind when I picked this recipe.  Maple can be an overwhelming flavor - but I liked how it wasn't overpowering in this dish.  I decided to pair this bread pudding with a classic creme anglaise - a cooked custard sauce that is so delicious, I could (and would) just eat it with a spoon!  I chose to use Julia Child's recipe - and it produced a deliciously smooth and creamy sauce that is perfectly mopped up with a bite of this bread pudding.

the full bread pudding...

the full bread pudding...

...and served with creme anglaise

...and served with creme anglaise

GINA: Classic Bread Pudding (via Cooks Illustrated) and Milk Chocolate Croissant Bread Pudding (via Food & Wine)

Gina made two different variations on the bread pudding theme.  The first was a classic bread pudding with good quality challah and a simple, but rich, egg custard.  With no additional flavors or ingredients - this recipe lets the simple flavors of the pudding shine.  What was unique about this recipe, is that you reserve some of your toasted bread cubes and sprinkle them on top of the soaked pieces, and brush them with melted butter.  This helps crisp up those pieces, so you get a nice contrast in texture.  So so good.  This was one of my favorites and a recipe I'll definitely make on my own!

Her other recipe used croissants (yum!) and chocolate (more yum!).  The egg custard is mixed with melted chocolate to make a chocolate custard and then additional chocolate pieces are mixed in along with the croissant cubes.  We all liked it, but felt that the custard itself didn't taste chocolatey enough.  I think you could try melting the full amount of chocolate in the recipe and add to the custard and then still add the called-for-amount of chocolate.  Or, you could also omit the melted chocolate from the custard and just let the chocolate pieces be the sole source of your chocolate flavors. 

Classic Bread Pudding

Classic Bread Pudding

Milk Chocolate Croissant Bread Pudding

Milk Chocolate Croissant Bread Pudding

KLARE: Pecan and Butterscotch Bread Pudding (via Bon Appetit)

Last, but definitely not least, Klare made a pecan and butterscotch bread pudding.  The original recipe calls for bourbon in the butterscotch sauce, but she omitted it, as none of us in the club are big fans of liquor in our desserts (call us crazy).  For the bread, Klare used Parkerhouse rolls from a local bakery, since that's what she had on hand - and they worked perfectly in this recipe.  As far as bread puddings go, this is a pretty standard recipe - but what makes this stand out are the addition of pecans (my favorite nut) and a delicious butterscotch caramel sauce. Perfection! 

Pecan & Butterscotch Bread Pudding

Pecan & Butterscotch Bread Pudding

January 08, 2016 /Libby Harrison
bread pudding, breakfast, dessert, baking club
desserts
Comment

Baking Club Adventure: Lava & Pudding Cakes

December 30, 2015 by Libby Harrison in desserts

In September, the Baking Club tackled Lava & Pudding cakes, after being inspired by the mug cakes that have become so popular on Pinterest.  I got hooked on the simplest chocolate mug cake recipe (just powdered sugar, cocoa powder and an egg!) - and may have made it almost every night for a few weeks, even serving it for dessert for guests who stopped by!  All of us in the baking club had different interpretations and results from the recipes we chose - but we all agreed - they're best served immediately from the oven, while the lava or pudding filling is still gooey and oozy. 

KLARE: Chocolate Lava Cake (via Huffington Post) & Lemon Pudding Cake (via Back in the Day Bakery Cookbook)

Klare brought two dishes to our meeting: a chocolate lava cake and a lemon pudding cake.  The chocolate lava cakes are made in small ramekins and slightly underbaked, so that when you serve them right out of the oven, they'll spill out some ooey gooey chocolatey-ness!  The lemon pudding cake was made in a larger baking dish (though, you could make it in individual ramekins) and is sort of a magic cake - you pour in the batter and during the baking process, a gooey pudding layer is created on the bottom of the cake.  When you scoop into the dish, you reveal the pudding layer underneath!

Chocolate Lava Cakes

Chocolate Lava Cakes

Lemon Pudding Cake

Lemon Pudding Cake

GINA: Raspberry Chocolate Lava Cake & White Chocolate Lemon Lava Cake

Gina also brought two dishes to the meeting: a raspberry lava cake - where the raspberry jam was mixed into the batter - so every bite had a fruity, chocolatey taste; and a white chocolate lemon lava cake - the white chocolate was subtle, but the lemon shined through nicely.

Raspberry Chocolate Lava Cakes

Raspberry Chocolate Lava Cakes

White Chocolate Lemon Lava Cakes

White Chocolate Lemon Lava Cakes

LIBBY: Apple Pudding Cake with Cinnamon Butter Sauce (via Betty Crocker)

In my search for a recipe, I came across this apple pudding cake - and with it being the fall, a spiced apple cake sounded delicious.  Wasn't sure how pudding-y it was going to be, though, but decided to go with it any way.  Well, the cake didn't exactly have a lava or pudding element to it (it had more of a bread pudding consistency) - but what it did have was a delicious caramel sauce that was poured over the top.  And Oh. Yum. G. This sauce is crazy good.  If I never make this cake again (and I would), at least I got the caramel sauce recipe out of the deal!

Apple Pudding Cake with Cinnamon Butter Sauce

Apple Pudding Cake with Cinnamon Butter Sauce

BONUS: Chocolate Lava Mug Cake

And as a bonus - here is the chocolate lava mug cake that I've made so many times (and will definitely make much more in the future!)  Chances are you already have all the ingredients in your pantry!

In a mug, mix 1/4 cup powdered sugar, 2 Tbsp cocoa powder, 1 pinch of salt, splash of vanilla and one egg.  Mix thoroughly until fully combined.  Optional: add a tablespoon of cold hot fudge (from a jar) or a tablespoon of peanut butter - let sink to the bottom - but don't stir - this is how you'll get the "lava" on the bottom! Cook in the microwave for 1 minute.  The cake will rise above the rim of the mug - but don't worry, it won't over flow.  When done, invert the cake into a small bowl or plate, letting the gooey lava of the fudge or peanut butter flow over the cake.  Serve with whipped cream and/or ice cream, if desired.

December 30, 2015 /Libby Harrison
baking club, lava cake, chocolate, lemon
desserts
Comment

Baking Club Adventure: Yeasted Cakes

October 18, 2015 by Libby Harrison in desserts

For our August Baking Club meeting - it was my turn to host and to select our theme.  I chose yeasted cakes after first hearing about them on The Great British Baking Show last season on PBS.  If you haven't checked out this show, I highly recommend it.  It's currently in its newest season on Sunday nights - and is so much fun to watch and learn!  With a more European bent to the types of desserts featured, I've been learning about new kinds of sweets and treats that have me wanting to run to the kitchen to start baking!

So, on one episode last season, one of the baking challenges was for yeasted cakes.  I was really intrigued by the concept and the history.  Before sponge cakes (which uses eggs) and chemical leaveners (like baking powder), the oldest method for making a cake rise was to use yeast. When I learned that, I thought "of course!", that makes perfect sense! So I was eager to go old-school.  

I think we all had fun trying this theme - though most of us had issues with our yeast rising in the expected time frames.  Not sure if was the humid, summer air, but it took a lot longer for our cakes to rise - and then once they did, we had a hard time getting them to stop!


LIBBY:  Orange Savarin with Cinnamon Cream (via BBC)

For my recipe, I chose one that was featured on The Great British Baking Show. It's an orange flavored savarin - a type of yeasted cake that is baked in a ring shape and soaked in a liqueur flavored syrup.  What appealed to me about this recipe, was the prominent orange citrus flavor and the accompanying cinnamon whipped cream.  For the most part, following the recipe worked well, though I had some trouble with getting my batter to rise and then once it did, from rising too fast!  But it baked up well and after cooling, the cake absorbed a stunning 2 cups of syrup!  While the cake was delicious and didn't taste too "yeasty" - I probably won't make another yeasted cake again.  When I want cake, I'll make a cake; when I want bread, I'll make some bread - this savarin fell a little too in the middle for me.


GINA: St. Louis Gooey Butter Cake (via Smitten Kitchn)

Gina brought a scrumptious gooey butter cake, built on the base of a yeasted cake.  I had seen this recipe before and was so glad that Gina made it for baking club!  This cake is comprised of two layers: a yeasted cake topped with a sweet, buttery mixture that bakes up into a toasty, chewy, gooey topping.  I could have just filled up on that topping alone - so good!

TONYA: Yeasted Sugar Cake (via Epicurious)

Tonya brought a simple but flavorful yeasted sugar cake - it reminded us of the flavor of a donut.  I think you could probably spread a powdered sugar glaze all over and it would taste like a giant Krispy Kreme!  This cake is light and is a nice companion to coffee or tea.

KLARE: Yeasted Plum Tart (via David Lebovitz) and Yeasted Chocolate Coffee Cake (via Pastry Affair)

Klare brought with her two takes on the yeasted cake.  The first was a yeasted plum tart.  Klare, too, had issues with the yeast and ended up using the base of Tonya's yeasted sugar cake after the base in the original recipe didn't quite turn out the results she wanted.  She then followed the recipe, adding the fresh plums and streusel topping.  I'm always a fan of anything with streusel, and this was so delicious!  If you didn't want to make a yeasted cake base - you could use this plum & streusel combo with your favorite cobbler recipe.

Klare's second recipe, a yeasted chocolate coffee cake, was an example of the more bread end of the yeasted cake spectrum.  Yeasted cakes have a very close resemblance to soft, yeast breads like babka or stollen - and this coffee cake definitely fit the bill.  Klare used a nice dark chocolate in this coffee cake, which stood out nicely against the soft, slightly sweet bread. 

October 18, 2015 /Libby Harrison
baking club, cake
desserts
Comment

Ice Cream Social!

August 16, 2015 by Libby Harrison in desserts

It was my birthday last week and I decided to throw an ice cream social birthday party to celebrate!  One of the women from my baking club is moving to the UK for a few years and allowed me to "babysit" her ice cream maker while she's away.  I quickly began brainstorming all the different flavors I wanted to make.  I initially had a list of at least six different flavors but I think I was underestimating how much ice cream my friends and I could eat and how much my freezer could hold!  So I narrowed my list down to only four flavors.

My favorite everyday ice cream flavor is cookies and cream.  I found a no-cook vanilla base and decided to use birthday cake flavored Oreos to help make it extra special.  I think this was the crowd favorite at the party based on how much (more like how little) of it was left!

Cookies & Cream

Cookies & Cream

Since I had a vanilla based flavor, I knew I needed a chocolate one as well.  But I wanted to kick it up a notch and so I added chunks of candy bar.  And not just one candy bar, not two but four candy bars!  I stirred in a mix of Kit Kat, Twix, Snickers and Reese's Cups - all of my favorite flavors. 

Chocolate Candy Bar

Chocolate Candy Bar

As some of you may remember, I have made a pistachio cake the past few years for my birthday.  I decided not to make a cake this year but still needed to have pistachio in my life.  So I knew a pistachio ice cream was a must for my birthday.  This recipe differed from the previous two in that the ice cream base was a cooked custard.  And holy cow was this ice cream good.  I think it might have been one of the best scoops of ice cream I've ever had - and well worth all the extra steps, dirty dishes and calories!

Lastly, I made a fresh strawberry sorbet.  I found the recipe in a Ben & Jerry's cookbook and it was a nice, light alternative to the rich and heavy ice creams.  It reminded me of the little Italian water ice cups I used to eat as a kid.  It's a great refreshing treat to beat the heat of summer!

Once I had my theme and flavors selected, I focused on the decorations and party favors.  I saw many ideas I liked on Pinterest but as the party drew closer and closer, I only had so much time to get everything done.  To really highlight the theme, I got an ice cream cone table cloth and napkins and found the most adorable ice cream bowls and spoons that look like ice cream cones.

One of my favorite ideas I saw was to make ice cream cone balloons.  I got some pink, blue, green and purple balloons and took some brown kraft paper and formed it into a cone and attach it to the balloons.  In a bunch, they made the perfect center piece for the living room.

Now you can't have an ice cream social without all the sundae fixings!  I organized cups of candy, nuts, sprinkles and cherries onto one of those cardboard cupcake stands.  Cups of homemade whipped cream and bottles of chocolate sauce flanked the display.  Everything was set for a party!

Before my guests left, I wanted them to take a little favor from the party.  In addition to my friends' kids getting to take home their ice cream bowls, everyone got a little ice cream shaped chocolate.  I found the adorable chocolate mold online and painted and piped in melted chocolate to make these favors.  They were the proverbial cherry on top!

August 16, 2015 /Libby Harrison
ice cream, birthday, pistachio, candy, cookies & cream, berries
desserts
Comment

Tres Leches Cake

July 24, 2015 by Libby Harrison in desserts

We had a special birthday in my office this week and that required a special treat!  I had come across the idea for a tres leches cake earlier this month and filed that away in my brain.  So when the time came to make something for my co-worker, I decided to do some research for the best recipe.

At it's core, the cake is made with a traditional sponge cake soaked in three milks (the "tres leches"): evaporated milk, condensed milk and heavy cream.  Some recipes took shortcuts and used a vanilla cake mix and then the three milks.  But I wanted to be as authentic as I could be, and settled on a recipe from King Arthur Flour. I have yet to make a bad recipe from KAF, so figured I could trust them yet again to deliver.  And deliver they did!  

The sponge cake was made via the foam method, where you beat the egg whites and gently fold them into a simple batter of egg yolks, sugar, vanilla, baking powder, salt and flour.  You'll notice the absence of fat in this batter - instead of relying on butter in the batter for flavor, the fat and flavor come from the milks.

The best thing about a this cake is that even if you slightly over-bake the cake (like I did), it doesn't really matter, since the tres leches mixture softens up the cake and makes it moist and tender.  And slathering it in fresh, whipped cream doesn't hurt either!

Tres Leches Cake (adapted from King Arthur Flour)

For the cake:

  • 6 large eggs, separated
  • 1/2 tsp cream of tartar or 1/4 tsp lemon juice
  • 1 1/2 cups sugar
  • 1/3 cup cold water
  • 2 tsp vanilla extract
  • 1 tsp almond extract
  • 2 tsp baking powder
  • 1/2 tsp salt
  • 1 1/2 cups flour

For the milk soak:

  • 1 cup heavy or whipping cream
  • 1-14oz can sweetened condensed milk
  • 1-5oz can evaporated milk (note: you want the small can of evaporated milk - or use roughly half of a regular 12oz can)
  • 2 tsp vanilla extract

For the whipped cream:

  • 2 cups heavy whipping cream
  • 1/4 cup powdered sugar
  • 1 tsp vanilla extract

Preheat the oven to 350.  Lightly grease a 9x13 baking pan.  In a large bowl, beat the egg whites and the cream of tarter until soft peaks form.  Set aside.  In another large bowl, beat the egg yolks until combined.  Add the sugar and beat until light yellow and glossy and starts to thicken.  The mixture should fall like ribbons when you lift the beaters out of the bowl. Add the cold water,vanilla extract and almond extract and mix until well combined. Stir in the baking powder, salt and flour until just mixed in. Gently fold in the egg whites until there are no white streaks. Pour the batter into the prepared pan and bake for 28-30 minutes or until a toothpick inserted in the center comes out clean.  Let cool completely.

Using a chopstick or tines of a fork, poke holes all over the top of the cake. This is the fun part...you can go crazy!  In a medium bowl, mix the heavy cream, sweetened condense milk, evaporated milk and vanilla until thoroughly combined. Slowly pour over the cake, allowing for the cake to absorb the mixture as you go. This will seem like a lot of liquid, but don't worry...the cake will soak it all up!

In a cold, metal bowl, whisk the heavy cream, powdered sugar and vanilla extract just until stiff peaks form.  Spread over the top of the cake, cover and chill at least 2-3 hours or overnight.  Before serving, sprinkle cinnamon over the top of the cake.

July 24, 2015 /Libby Harrison
cake, birthday
desserts
Comment

Baking Club Adventure: Berries!

July 04, 2015 by Libby Harrison in desserts

For our June baking club meeting, our theme was berries!  We could make anything we wanted that involved berries.  We originally got on the topic of berries because 1) we knew that we'd be in prime berry season, particularly strawberries and 2) we had been talking about the beautiful fruit tarts you'd see in bakery shop windows.  A few days after our last meeting, I came across a blog post at King Arthur on how to make an easy glaze for a fruit tart - it was a sign!  I decided that this is what I would make for baking club.

We met at Karen's house on one of the hottest, stickiest days yet, this summer, but iced lemon water and a variety of fresh berry desserts kept us cool.  Our interpretations on the theme were quite varied: we had tarts, tortes, pavlovas and gelees! 

Read on for recipes and photos from each member!


LIBBY: Cheesecake Fruit Tart with Macadamia Nut Crust

I had just returned from vacation in Hawaii the day before our baking club meeting - and was feeling inspired by all the delicious macadamia nuts I ate while on my trip.  I brought back a bag of honey roasted macadamia nuts - and knew that I needed to make a crust with them!  I combined the mac nut crust with an easy cheesecake filling and even easier fruit glaze tip from King Arthur Flour.  The result was a crunchy nutty crust, creamy filling and refreshing fruit topping.  Very easy to put together and provides show-stopping results!

Crust:

  • 3/4 cup macadamia nuts, toasted
  • 1 1/2 cup flour
  • 1/4 cup sugar
  • 1 stick butter, chilled
  • 2 egg yolks

In a food processor, pulse macadamia nuts, flour, sugar and butter until resembles coarse crumbs.  Add egg yolks just until mixture comes together, but is still crumbly.  Press into bottom and up sides of 11 inch tart pan.  Bake in a 375 oven for 20 minutes. Set aside to cool.

Follow easy cheesecake filling and easy fruit glaze steps at the links to finish up this tasty treat!

KAREN: Berry Blitz Torte (via King Arthur Flour)

This was a delightful treat filled with two of my favorite things: strawberries and almonds.  The cakes use egg yolks and a thin layer is poured into the bottom of two cake pans.  The whites from the eggs are then whipped into a meringue and spread over the batter. Sprinkle almonds, cinnamon and sugar over the meringue and bake the whole thing in the oven. Then it's a matter of adding pastry cream (to which Karen added almond extract and vanilla bean) and strawberries between the two cake layers.  You can make each element of the dessert ahead of time - but you'll want to serve immediately after assembly.  I love how the almond topped meringue makes for its own beautiful decoration - don't you?

TONYA: Pavlova with Balsamic Strawberries (via Smitten Kitchen & Nigella Lawson)

I've never had or made pavlova before - and I think this was a great recipe to have been my first!  The pavlova was light and fluffy and cut beautifully.  Served with fresh whipped cream and balsamic strawberries - it is the perfect, light summer treat.  Tonya found her pavlova recipe from Smitten Kitchen and the balsamic strawberries from Nigella Lawson.  Another great thing about pavlovas - they sound and look fancy to make - but according to Tonya, are very easy to put together - and gluten free!

GINA: Classic Fresh Fruit Tart with Pastry Cream (via Cook's Illustrated)

Gina's recipe is a classic strawberry tart filled with a delicious pastry cream from the experts at Cook's Illustrated.  The base is a not-too-sweet cookie crust, a creamy pastry cream filling and heaping pile of fresh strawberries with a glossy glaze on top.  Can't go wrong with a classic!

KLARE: Lemon Balm and Blueberry Gelee (via Epicurious) and Berry Gelees (via Canadian Living)

Klare broke the strawberry trend and came with a refreshing boozy blueberry gelee with fresh lemon balm from her garden!  The original recipe called for lemon verbena - but she swapped it out with the lemon balm she had growing in her backyard.  And did I mention that it was boozy? Yup - there are 2 cups of wine in this recipe (though the alcohol gets cooked off).  But the wine flavor beautifully complements the fresh blueberry and lemony flavors.  Consider this a grown-up Jell-O jiggler!

Klare also brought a second recipe of a mixed berry gelee from Canadian Living.  This was a little sweeter and more candy-like.  A tasty cross between Jell-O and gum drop.  I forgot to take a picture of this one - but you can see a good picture via the link.

July 04, 2015 /Libby Harrison
baking club, berries
desserts
Comment

Happy Blogiversary!

March 18, 2015 by Libby Harrison in desserts

Hello readers!  Can you believe it's been one year since this whole crazy thing started?  One year ago I was stuck at home in the snow and decided to finally start this blog - and I am so glad I did!  I've had so much fun sharing favorite recipes from my personal recipe box as well as trying out new recipes and techniques.  Whether the recipes were simple or a little more complicated, what they all had in common is they were OyuMG delicious!

Since this blog started with a St. Patrick's Day recipe, I thought it was only fitting that we celebrate its blogiversary with another holiday recipe: Pretzel Shamrocks!  I found this recipe to be 1) stinkin' adorable and 2) super-duper easy to make.  All you need is a baking sheet and and oven.  No bowls, no spatulas - just a little assembly and you've got yourself some festive treats for office or classroom celebrations!

You may be familiar with the chocolate pretzel concept, where you top a Snaps pretzel with a Hershey's Kiss or Hugs, put it in the oven for just a few minutes to soften the chocolate and top with an M&M in a color that fits your theme.  There are tons of variations out there (like using Rolos and pecans to make a Turtle-inspired treat) - and this treat is just one more variation on the theme.

This time, you take three pretzel twists and arrange them in a shamrock formation and top with a Hershey's kiss in the middle, where all three pretzels come together.  Then carefully transfer the pan to the oven and bake at 300 for 3-4 minutes until the chocolate is softened.  Take a pretzel stick and press into the Hershey's Kiss at the base of each shamrock and then place a single M&M on top, pressing down so the melted chocolate spreads a bit and sticks to all the pretzels.  Let the pans cool and then transfer to the fridge to fully set the chocolate.

Then take them to the office or send with your kids to school - and you'll have a treat that will have everyone smiling and feeling the "luck o' the Irish"!

Thanks for a delicious first year - here's to many more!

image.jpg
March 18, 2015 /Libby Harrison
pretzel, chocolate, holiday
desserts
Comment

Chocolate Toffee Grahammies

February 08, 2015 by Libby Harrison in desserts

The Grammy Awards are tonight and I was inspired to make something to snack on while I watch the show.  I thought about some options related to music or some of the songs nominated this year, like maybe "Chocolate Shake-It-Offs" or "Bang Bang Shrimp Cocktail".  But then I thought about graham crackers... or "grahammy" crackers and what could I do with the box of graham crackers in my pantry.  After a little research, I came up with what looked to be a pretty quick and easy recipe featuring caramel sauce, chocolate and pecans.  What could go wrong?

Well, apparently, quite a bit.  That's right...I had an epic food fail - of unfixable proportions.  The recipe called for butter and sugar to be brought to a boil on the stove.  Having just made caramel corn in the microwave, I thought to myself, "I don't need to dirty another pot.  I can just make it in the microwave."  So that's what I did.  The recipe said to boil for about 4 minutes - so I thought 5 minutes in the microwave should do just fine.  Five minutes later, I did have melted butter and dissolved sugar, but as I started to stir with a spatula, the butter would not incorporate into the mixture and the sugar was a little grainy.  So I got a whisk...maybe whisking it in will work better.  Nope.  I thought, "maybe my immersion blender will really bring it together".  Instead, I had hot butter flying over my counter, splattering on my hand and fully saturating my dish towel.  At this point, I literally threw the dish towel in and decided to start over.

Out came the saucepan, the proper measurements of butter and sugar (I may not have been super exact the first time around), and I brought the mixture to a boil. Stirring constantly, I was rewarded with a perfectly colored caramel sauce - golden and delicious.  From there, it was smooth sailing and the rest of the recipe came together in no time.  The hardest part was waiting for it to cool so I could dig in to this highly snackable treat.

Chocolate Toffee Grahammies

  • 16-17 graham crackers
  • 1 cup butter
  • 1/2 cup dark brown sugar
  • 1 1/2 cups semi-sweet chocolate chips
  • 1 cup toasted & chopped pecans

Preheat oven to 350 degrees. Line a jelly roll pan with foil and spray with non-stick spray.  Lay graham crackers in the pan until completely covered.

In a saucepan, melt butter and brown sugar.  Stirring constantly, bring to a boil and cook for 4 minutes.  Pour the caramel sauce over the graham crackers.  Bake in the oven for 8 minutes.

Immediately, sprinkle the chocolate chips over the caramel and wait about 2 minutes for the caramel to melt the chocolate chips.  With a knife, spread the melted chocolate over the entire pan.  Sprinkle with the chopped pecans and let cool about 2 hours before breaking into big pieces. (You can also pop it in the fridge to speed up the cooling process, cause you know you wanna dig in as soon as possible.)

Note: If you don't have graham crackers on hand, you can also use saltines or pretzel thins as your base.  Be creative!

February 08, 2015 /Libby Harrison
chocolate, graham crackers, caramel
desserts
Comment

Caramel Popcorn: Your Next Addiction

February 07, 2015 by Libby Harrison in desserts

I seem to have this penchant for making things that are truly addictive.  That once-you-pop-you-can't-stop kind of addicting.  Brownies, cookies...basically anything with sugar.  And now I bring you your next addiction: Homemade. Caramel. Corn.  Holy cow, is this stuff so good.  And I dare you to make a batch last longer than the weekend.  Seriously.

So this recipe has been with me for nearly twenty years...I first made it my middle-school home economics class! The fun thing with this recipe, is that start-to-finish, it's made completely in the microwave.  No heating up your oven, no fancy equipment, if you've got a bowl, a microwave and a paper bag, you can make this recipe!

There are three microwave phases for this recipe: the popcorn phase, the caramel phase and the caramel corn phase.

PHASE ONE: Start off by popping 3 standard bags of microwave popcorn. I use the 94% fat-free, low-butter variety, because, believe me, you'll be adding more than enough butter once the caramel sauce is covering each and every kernel.  Then take a standard, grocery-store size paper bag and spray the inside of it about 2/3 of the way up with non-stick spray.  As you pop your popcorn, dump each bag into the paper bag.  

PHASE TWO: In a large, microwave-safe glass bowl, add brown sugar, butter and corn syrup.  Microwave on high for 8 minutes.  Carefully remove from the microwave and stir.  Add baking soda, baking powder and vanilla and stir.  When you add the vanilla, it will start to change the color and consistency (it will get frothy and may rise a bit).  Keep stirring until the mixture is uniform.  It should be a light, golden brown.

PHASE THREE: Carefully pour the caramel mixture over the popcorn in the paper bag.  With a long rubber spatula, mix the caramel and popcorn until all kernels are covered.  Roll up the top of the bag and put the whole thing in the microwave.  You may have to smoosh it in there to make sure that the turntable will still rotate.  Microwave on high for 3 minutes.  Open the bag and mix with the rubber spatula for about 30 seconds, making sure to scrape the bottom.  Roll the bag and return to the microwave for another minute.  Mix for about 30 seconds and microwave for a last burst of 30 seconds.  Either line two jelly roll pans or your countertop with wax paper and carefully pour the caramel corn on top.  Spread out in an even layer and separate the pieces as it cools.  Once the corn is finally cool, break up any large chunks and store in an air-tight container.  It will keep pretty fresh for about a week - that is, if it makes it that long!

Microwave Caramel Corn

  • 3 standard bags of microwave popcorn, popped
  • 2 cups dark brown sugar
  • 1 cup butter (or margarine)
  • 3/4 cup light corn syrup
  • 3/4 tsp baking soda
  • 3/4 tsp baking powder
  • 1/4 tsp salt
  • 1 tsp vanilla

Pop the popcorn and put into a large brown paper bag, sprayed with non-stick spray on all sides.  Set aside.

In a large bowl, place the butter, brown sugar and corn syrup.  Microwave on high for 8 minutes or until the brown sugar is dissolved and the mixture is at a rapid boil. 

Remove from microwave and add baking soda, baking powder, salt and vanilla.  Be aware that mixture may rise.  Carefully pour the caramel over the popcorn in the bag and thoroughly stir until all the popcorn is coated in caramel.  Roll up the bag and microwave on high for 3 minutes.  Stir the popcorn for 30 seconds. Return to microwave for 1 minute.  Stir the popcorn for 30 seconds.  Return to microwave for 30 seconds.  Stir one last time and let the popcorn cool on wax paper covered pans or countertop.  Once cooled, break up any large pieces and store in air-tight container. 

February 07, 2015 /Libby Harrison
caramel, popcorn, gluten free
desserts
Comment

The BEST Brownies...EVER

January 16, 2015 by Libby Harrison in desserts

OK.  I realize that's a very bold statement to make: that I have the recipe for the BEST brownies ever. But it's true!  I've made my fair share of homemade and box mix brownies and none hold a candle to this recipe.  These brownies have it all: triple chocolate flavor, super thick fudginess, the flaky crust on top.  Best of all, they only require one bowl, a whisk and a spatula.  No fancy kitchen gadgets required here!  And with a baking time of about 30 minutes, they can be whipped up in no time at all! They taste like the best box mix brownies you've ever had...but better (and let's be honest, box mix brownies are pretty hard to beat)!

I've been wanting to share this recipe with you for a while now, as I've made it at least half a dozen times since discovering it earlier this past summer.  They're a perfect treat for birthdays, road trips, church potlucks, or those days when the only thing that will make life better is chocolate.  So without further ado...I give you the BEST brownies.  EVER.

The BEST Chocolate Fudge Brownies...EVER

  • 1/3 cup cocoa powder
  • 1 1/2 tsp instant espresso powder
  • 1/2 cup plus 2 Tbsp boiling water
  • 2 ounces unsweetened chocolate, finely chopped
  • 4 Tbsp (1/2 stick) butter, melted
  • 1/2 cup plus 2 Tbsp oil
  • 2 large eggs
  • 2 large egg yolks
  • 1 tsp vanilla extract
  • 2 1/2 cups sugar
  • 1 3/4 cups flour
  • 3/4 tsp salt
  • 1 cup chocolate chips

Preheat your oven to 350 degrees. Line a 9x13 glass pan with foil (leave some hanging over the sides so you can use as handles later on) and grease with nonstick spray. Trust me, do not skip this step! 

In a large bowl, whisk together cocoa powder, espresso powder and boiling water.  Add the finely chopped unsweetened chocolate.  (Note: Make sure you buy unsweetened squares (like Baker's brand).  To easily chop the chocolate squares, place them in a Ziploc bag and give it a few whacks with a meat pounder.  So much easier that trying to chop with a knife.)  Whisk until the chocolate is melted.  

Add in the melted butter and oil (the mixture may look curdled, but it's OK).  Add the eggs, egg yolks and vanilla next and mix until the mixture is smooth.  Whisk in the sugar until fully incorporated. Switching to your spatula, gently mix in the flour and salt until combined.  Fold in the chocolate chips.

Pour batter into your prepared pan and bake 30-35 minutes or until a toothpick inserted in the middle comes out with just a few soft crumbs attached.  Let cool for about an hour on a wire rack before lifting out of the pan (this is where those foil overhang handles come in handy) and return to the wire rack.  Let cool completely (or just nearly completely if you can't wait to have warm fudgy brownies!)

Cut into 2-inch squares, serve and watch them disappear!

Yield: 24 brownies

Adapted from Cook's Illustrated.

January 16, 2015 /Libby Harrison
chocolate, brownies
desserts
1 Comment
photo 5.JPG

Oh-Yes-HoneyCakes!

September 26, 2014 by Libby Harrison in desserts

This is a special day in O-Yum-G history...we have our first guest blogger!  A friend and colleague of mine brought in these delicious honey cakes this week to the office.  They were so good, I greedily asked for a second one!  And then the recipe!  And then I asked if he wanted to share the recipe with all of you on O-Yum-G!  And so he did.  While these were inspired for the Jewish holiday Rosh Hashanah, these honey cakes are delicious for any occasion, year-round.  So please give a warm, welcome to Alma!


Dear Readers of O-Yum-G!

Right after her lips touched my honey cakes, it happened.

Libby asked me to guest blog.

This is my first time, I swear, but I am so tickled to be here!

My name is Alma Childrens. It's pronounced ALL-ma...Chill-rinz. The D is silent. In addition to being a man in a dress, I'm also an avid baker who doesn't take him or herself too seriously. As you can see by the shoes & hair, I've got a reputation for being a tad over-the-top but all in very good (and bad) taste.

This adventure begins where most dreams do: in the clearance section of Crate & Barrel. That's where I go to be alone...and save money on discarded home goods nobody wants. 

Every girl has their secrets - that's (one of) mine.  For just $9.97, I bought this:

A Waffle Dipper Pan!

Later that day when I was having my nails done, I found an article in one of my favorite periodicals: "The Jew & The Carrot."

Get your mind out of the gutter, ladies...it's not that kind of magazine!

In it, there was an article about traditional Jewish foods of Rosh Hashanah.  Honey Cake, it said.  Honey.  Cake.

Being the good Christian Drag Queen I am, I prayed...I could find the library...to do some research on Honey Cake.

Sha-na-na-na-naa-na-nah!  Sha- na-nah-nah-na!

As it turns out, Honey Cake is a symbolic Jewish super food & undisputed fixture on the Rosh Hashanah table.

Honey Cake originated in ancient civilization times, like, a bazillion years ago when togas were all the rage - not a good look, ladies.  Not a good look.  Anyway...

The method was usually very simple: flour and honey were mixed together and then mixture would "sit" for approximately a month until naturally-produced yeasts caused it to rise.  This formula took hundreds of years to develop - why? I'm not sure, but bless their hearts.

In addition to its sweet taste, honey has a hidden power: a natural preservative able to keep pastry fresh for a long time.  And in the days of no refrigeration (or mascara) this was, like, totally handy dandy.

Fast forward like a zillion years.  And here we are.

Alma Children's recipe for "OH-YES-HONEYCAKES!"

Do not fret...it works for cupcakes, as well as waffle dippers.  And it's a SNAP! to do.  I'm also including a very easy recipe for a honey glaze that kicks these up a notch and adds a shiny sticky veneer to these!

I hope you enjoy the recipe, honey childs!  Hope to talk to you again soon...I think Libby and I should do a video blog entry.  Tell us what you think about that idea!

Love, 

Alma Childrens


ALMA'S OH-YES-HONEYCAKES

By, who else? Alma Childrens!

(Adapted from a recipe on Baking Bites)

Here's what you'll need, Ladies:

  • 1 1/2 cups flour
  • 1 teaspoon baking powder
  • 1/4 teaspoon salt
  • 1 teaspoon cinnamon
  • 1/2 cup (1 stick) butter or margarine
  • 2/3 cup brown sugar
  • 2 eggs
  • 1 teaspoon vanilla extract
  • Finely grated zest of one lemon
  • 1/3 cup honey
  • 1/3 cup milk or non-dairy substitute

Instructions:

Preheat oven to 350.  Have a glass of wine.  Then...

In a small bowl, whisk together the flour, baking powder, salt and cinnamon.  Set aside.

In the bowl of an electric mixer, cream together the butter/margarine and brown sugar until smooth.  Add the eggs and vanilla extract and lemon zest and beat until smooth.  Beat in the honey.  With the mixer on a low speed, slowly stir in the flour mixture until combine.  Add the milk and stir until incorporated.

Bake at 350 for 9-10 minutes if you're using the pan I used.  15-16 minutes for cupcakes, etc.  WARNING: Do not over-bake, Honey!  You'll just have to take my word for it.

Remove from oven and set aside to cool.  Have another glass of wine...you look thirsty.

ALMA'S SHINY BROWN SUGAR GLAZE

  • 1/2 cup brown sugar, packed
  • 1/2 tsp vanilla extract
  • 2 Tbsp water

Combine brown sugar, vanilla, and water.  Whisk together until smooth.  I do this in a saucepan over very low heat.  I like the consistency of the glaze better when it's warm, but you can do this at room temperature.  It takes 1-2 minutes to get just right, then I apply it with a pastry brush to the cakes which have cooled for at least 10 minutes.

Sometimes when I'm feeling sassy, I add a dusting of gold sprinkles or powdered sugar.  Because too much is never enough, ladies.  Never!

September 26, 2014 /Libby Harrison
honey, guest blogger
desserts
Comment

Kit-Kat Krispies

May 15, 2014 by Libby Harrison in desserts

Happy National Chocolate Chip Day!!  A day where we celebrate the tiny little nuggets of chocolatey goodness.  A little history lesson: the chocolate chip was invented back in the early 1930s by Ruth Graves Wakefield at the Toll House Inn in Whitman, Massachusetts.  She had been making cookies one day and added a chopped up bar of Nestle semi-sweet chocolate.  Some say it was intentional (she was trying to change up a toffee cookie recipe), others say it was accidental (she ran out of baking chocolate and used a bar of Nestle, expecting it to melt completely).  Either way, they were such a hit that she ended up striking a deal with Nestle to provide her cookie recipe on the package of the Nestle chocolate bars in exchange for a lifetime supply of chocolate. The Nestle Toll House brand is named after the inn where she cooked up her now world famous recipe!  Quick aside: anytime I hear Nestle Toll House, I think of the Friends episode where Monica tries to recreate Phoebe's grandmother's cookie recipe, only for it to actually be the Nestle Toll House recipe or as Phoebe says it "NESS-lay TOOL-ow-zeh".  You can catch a clip of it here.

So, history lesson out of the way, what better way to honor this most auspicious of days than with a batch of chocolate chip cookies? But let's not just make regular ole' chocolate chip cookies...let's make them with a twist!  And so I give you Kit-Kat Krispies...a crispy-on-the-outside, soft-and-chewy-on-the-inside chocolate chip cookie loaded with Kit-Kat bars, semi-sweet chips, Rice Krispies and potato chips. Yes, potato chips!  Trust me...you'll want to add a lunch sized bag of potato chips to your chocolate chip cookies from now on. 

This recipe was the product of some experimentation and merging of a couple recipes.  A few years ago, I discovered this amazing dessert restaurant in New York City called Milk Bar (if you're ever in NYC you MUST go!). Their claim to fame is the Compost Cookie, an everything-but-the-kitchen-sink cookie that utilizes a little bit of whatever you have on hand: chocolate chips, pretzels, candy bars, coffee grinds, graham crackers, nuts, whatever.  There's a lot of creaming (10 minutes worth!) and some chilling of the dough (at least 2 hours) and making a graham cracker crust to crumble in.  All of which is worth it when you have the time.  But most of the time, when I'm in the mood for chocolate chip cookies, I've got an inner Cookie Monster rumbling inside and she wants her cookies NOW!  So I took the concept of adding in a variety of different ingredients you wouldn't normally throw in a chocolate chip cookie and applied it to my very favorite and easy chocolate chip recipe. This is a highly adaptable recipe; you can make it as simple or complex as you like.  Just try to keep the total volume of your mix-ins to about 1 1/2 cups.  O-YUM-G!  So here we go:

View fullsize IMG_3179.jpg
View fullsize IMG_3181.jpg
View fullsize IMG_3182.jpg
View fullsize IMG_3183.jpg
View fullsize IMG_3184.jpg
View fullsize IMG_3186.jpg
View fullsize IMG_3189.jpg
View fullsize IMG_3191.jpg
View fullsize IMG_3198.jpg

KIT-KAT KRISPIES

  • 1/3 cup butter, softened
  • 1/3 cup shortening, butter-flavored
  • 1/2 cup white sugar
  • 1/2 cup brown sugar
  • 1 egg
  • 2 tsp vanilla
  • 1 3/4 cup flour
  • 1/2 tsp salt
  • 1/2 tsp baking soda
  • 2 packages Kit-Kat bars (regular size), chopped
  • 1/3 cup semi-sweet chocolate chips
  • 1/3 cup Rice Krispies cereal
  • 1 oz bag potato chips

Preheat oven to 375 degrees.  Cream your butter, shortening, white sugar and brown sugar until smooth. Add egg and vanilla and mix until smooth and lightened in color.  Add your flour, salt and baking soda. Mix until just combined.  Then stir in the Kit-Kat pieces, chocolate chips, Rice Krispies and potato chips.  Stir until just combined.  Don't overmix.  With a cookie scoop, portion out balls of dough onto ungreased cookie sheet about 1-inch apart.  Bake for 10-12 minutes until lightly golden brown.  Don't overbake.  Let cool on the cookie sheet for 2-3 minutes; then transfer to a cooling rack to cool completely.

Yields 32 cookies.

May 15, 2014 /Libby Harrison
cookies, Milk Bar
desserts
Comment

It's All Greek to Me - Part One

May 11, 2014 by Libby Harrison in desserts

Happy Mother's Day!  It's been a celebration weekend for sure - honoring friends with graduations, friends with birthdays and of course, my mom and those who have been like a mom to me.  I'm now sitting on my sun porch enjoying the beautiful weather and the springtime chatter of the birds chirping, lawn mowers humming and kids laughing on the swingset.

One of the celebrations this weekend was for the birthday of a dear friend of mine.  It has become tradition with us to meet at our favorite Greek restaurant whenever we get together for dinner.  Since I was hosting at my house, I figured I would bring the Greek to us!  On the menu was chicken souvlaki, homemade pita, Greek salad and baklava.  None of which I had ever made before.  The pressure was on!

First up to make was the baklava.  I researched several recipes and settled on one by The Pioneer Woman.  Baklava, if you've never had it, is comprised of layers of flaky phyllo dough and nuts tossed in cinnamon with a sticky honey syrup mixture poured all over top.  Delicious!!

One of the main ingredients in baklava is nuts.  I've seen recipes that use walnuts, pistachios or pecans or some combination.  I chose to use equal amounts of pistachios and pecans, two of my favorite nuts.  A quick note about nuts - I have a steadfast rule that I always toast my nuts before adding to pretty much any recipe (savory or sweet).  Toasting brings out the flavor of the nut and also gives it a crispy texture.  Trust me, it's worth the extra step.

So after the nuts are toasted, pour them into the bowl of a food processor and add in some cinnamon and pulse the nuts a few times until they are evenly chopped into small bits.  Then set that aside.

Phyllo (FEE-loh) dough, which can be found in the frozen desserts section, comes in boxes with two packages of dough.  You'll only need one package for the baklava.  You'll also want to the thaw the dough in advance.  Either place in the refrigerator the night before, or if you forget (like I did), you can let it thaw on the countertop for a couple of hours.  A quick word on phyllo dough - it's a very thin and paper-like dough and dries out very quickly.  It's important to keep any dough you're not working with, covered in plastic and then a damp cloth on top.

Before we start working with the phyllo, we need to melt some butter so we have it at the ready.  Now that everything is in place, take two sheets of the phyllo dough and place on a clean surface. (Remember to cover the remaining dough with plastic and the damp cloth!) Brush the melted butter on top of the top layer of dough and then place in a greased 9x13 pan, buttered side down.  Grab another two sheets of dough, butter the top layer and place in the pan, again, buttered side down.  Repeat this process again; you'll now have six total layers of dough (three of them buttered).

Bring over that bowl of nuts and grab a good handful or two of nuts and sprinkle evenly over the phyllo dough.  Take another two sheets of phyllo dough, butter the top layer, place in pan (buttered side down) and again sprinkle nuts over the top.  Repeat this process until you've used up all the nuts.  Then, just as we did in the beginning, top with six sheets of dough, adding in batches of two, with the top layer buttered.  Brush a final coat of butter over the top.

Before we bake, we need to pre-cut the baklava with a sharp knife.  Traditionally, baklava is cut on the diagonal to make diamond shaped pieces.  If this is too fancy for you, you can always cut into traditional squares.

Bake the baklava in a 350 oven for 45 minutes or until a deep golden brown.

While the baklava is baking, we need to make the honey syrup-y nectar of the gods mixture. This is a crucial part of the baklava - it's the source of a lot of the flavor and all the sticky sweetness.  In a saucepan, combine butter, honey, sugar, water and vanilla until it comes to a boil.  Reduce to low and let simmer for about 10-15 minutes.  Remove from heat and set aside until the baklava is done baking.

Once the baklava is done baking, drizzle the honey syrup all over the top and let it seep into all the nooks and crannies.  Then comes the hardest step...waiting for it to cool!  It's actually very important to let it sit uncovered for several hours so that the honey syrup can set and all the flavors meld together.

I was able to follow these directions and wait to dig into the baklava until my guests had arrived (but man, it was hard).  During the evening, I learned that one of my friends had studied abroad in Greece and she said this baklava reminded her of the ones that her host mother would make.  Wow....such high praise!  

I ended up making a few modifications from the original recipe.  First, I toasted the nuts.  Second, I increased the cinnamon from 1 tsp to 1 Tbsp.  Lastly, I reduced the amount of honey from 2 cups to about 1 1/2 cup (a 12 oz bottle). I think these changes allowed for each of the ingredients to distinctly shine through without overpowering the others.  O-YUM-G!

Here's the full recipe:

BAKLAVA

For the nut/phyllo layers:

  • 2 cups pistachios
  • 2 cups pecans
  • 1 Tbsp cinnamon
  • 6 Tbsp butter, melted
  • 1 package phyllo dough, thawed

For the honey syrup mixture:

  • 1 stick of butter
  • 12 oz bottle honey (approx. 1 1/3 cup)
  • 1/2 cup sugar
  • 1/2 cup water
  • 1 Tbsp vanilla

Toast nuts and place in bowl of food processor with the cinnamon.  Pulse a few times until evenly chopped into small bits.  Set aside.

Melt the butter.  Take two sheets of phyllo dough and place on a clean surface. (Remember to cover the remaining dough with plastic and the damp cloth!) Brush the melted butter on the top layer of dough and place in a greased 9x13 pan, buttered side down.  Grab another two sheets of dough, butter the top layer and place in the pan, again, buttered side down.  Repeat this process again; you'll now have six total layers of dough (three of them buttered).

Sprinkle a handful or two of nuts evenly over the phyllo dough.  Take another two sheets of phyllo dough, butter the top layer, place in pan (buttered side down) and again sprinkle nuts over the top.  Repeat until all the nuts are used.  Top with six sheets of dough, adding in batches of two, with the top layer buttered.  Brush a final coat of butter over the top.

Pre-cut the baklava with a sharp knife into either diamonds or squares

Bake the baklava in a 350 oven for 45 minutes or until a deep golden brown.

While the baklava is baking, combine butter, honey, sugar, water and vanilla in a saucepan until it comes to a boil.  Reduce to low and let simmer for about 10-15 minutes.  Remove from heat and set aside until the baklava is done baking.

Once the baklava is done baking, drizzle the honey syrup all over the top and let it seep into all the nooks and crannies.  Let sit uncovered for several hours.

Yields 24 pieces.

Recipe adapted from The Pioneer Woman

May 11, 2014 /Libby Harrison
dessert, Greek
desserts
Comment

Peanut Butter Oreo Cheesecakes

April 27, 2014 by Libby Harrison in desserts

So yesterday was my good friend Rebecca's birthday and I was in the mood to bake (shocker, I know).  I asked her if she had any requests, or flavor favorites (or flavorites?) and she mentioned something chocolate or peanut butter or coffee (which she said in jest since she knows I dislike all things coffee).  So I said,  Challenge Accepted!

I began to think of some ideas that included both chocolate and peanut butter...maybe cookies, maybe cupcakes and then I remembered these individual Oreo turtle cheesecakes I had made a few weeks ago, that were incredible.  I only needed to make some modifications and we'd have our something chocolate and something peanut butter!  The other reason I liked this idea is because this recipe is super easy to put together and I already had all the ingredients - so no special trip to the grocery store!

The concept is this: use a whole Oreo cookie as your crust, quickly whip up your filling, add your toppings and bake for 15 minutes.  That's it!

So let's get started.  First, gather all the ingredients. Line a muffin pan with muffin liners and place a whole Oreo in the bottom of each liner. 

Then you mix your filling ingredients all up in a bowl.  The batter will be pretty thick.

Scoop the filling on top of each Oreo - once again, I used my trusty #40 scoop to portion out the filling.  You may need to press down the filling a bit to get it to spread completely over the cookie.

For the topping, I chose mini Reese's peanut butter cups (no unwrapping of foils!) and chopped them up into pieces.  And since these were for Rebecca's birthday, I added some chocolate sprinkles to make them extra festive and made a special rainbow sprinkled one for the birthday girl.

Then it was into the oven for these guys for 15 minutes at 325.  Then just let them cool and then refrigerate until chilled.  When I served them at the party, I added a little sea salt caramel sauce drizzle to give them that little somethin' somethin'.  And they were a hit!  The birthday girl loved them and she lived happily ever after (or something like that)!

Here's the full recipe:

PEANUT BUTTER OREO CHEESECAKES

  • 12 Oreo cookies
  • 1 8-oz package cream cheese, room temperature
  • 1 egg
  • 1/4 cup sugar
  • 1/4 cup peanut butter, smooth
  • 1 tsp vanilla
  • 1/2 cup chopped Reese's peanut butter cups
  • 1/4 cup caramel sauce (optional)

Preheat oven to 325. Line a muffin pan with muffin liners and place one Oreo in the bottom of each tin.  In a large bowl, mix cream cheese, egg, sugar, peanut butter and vanilla until blended and smooth.  Scoop out cheesecake filling across the cookies evenly.  Sprinkle chopped peanut butter cups over each cheesecake.  Bake in oven for 15 minutes or until cheesecakes are set.  Bring to room temperature.  Unwrap cheesecakes from their paper linings and refrigerate until chilled. When ready to serve, arrange on a plate and drizzle caramel sauce over the top.  

Yields 12 individual cheesecakes.

Note:  To make the original Oreo Turtle Cheesecakes, omit the peanut butter in the batter.  Before baking, sprinkle chopped toasted pecans and mini chocolate chips over each cheesecake.  Before serving, drizzle caramel sauce over top.

April 27, 2014 /Libby Harrison
dessert, peanut butter
desserts
1 Comment
nutterbutters.jpg

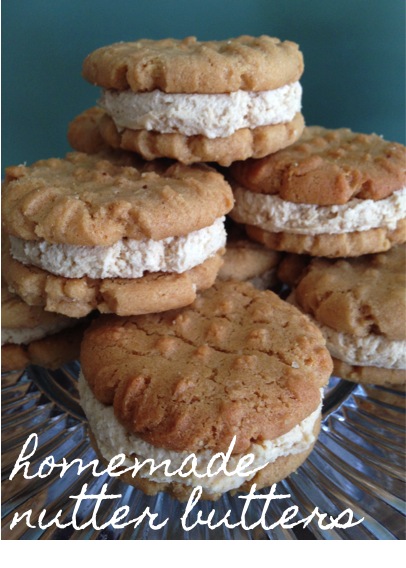
Homemade Nutter Butters!

April 07, 2014 by Libby Harrison in desserts

Greetings, friends! Hope you all had a great weekend.  Mine was very good but quite full of brunches, parties and baking!

So one of the parties I went to this weekend was a homecoming celebration for the fiancee of a family friend who had been away on deployment with the Navy. I wanted to bring something special to the party, and since the bride-to-be is gluten free, I had the perfect party treat in mind: homemade nutter butters (you may begin drooling now).

For years, I've been making my go-to recipe for peanut butter cookies, one that I discovered while watching Sara Moulton on the Food Network (remember Cooking Live?).  It's a simple, flourless peanut butter cookie, which really lets that peanut butter flavor take center stage.  One of my complaints with traditional peanut butter cookie recipes is that once you add the flour, it dilutes the flavor.  But not with these.  These little gems taste like pure peanut butter and just melt in your mouth. So, as I said, I've been making these for years, and was quite content with just eating them as they were. 

But one day, I was browsing the interweb (I make up words from time to time) and came across the idea of making a homemade version of Nutter Butters. I immediately went to my kitchen, whipped up these cookies and then made a peanut butter frosting filling. They say peanut butter and jelly are the best combination but I say peanut butter and peanut butter trumps all.  Just make these nutter butters and I think you'll agree!

Let's get started.  One of the best things about this recipe is that it requires 4 simple ingredients and can be mixed together by hand.  No special equipment required! So grab a large bowl and a rubber spatula and mix together your peanut butter, sugar, egg and baking soda (really! that's all the ingredients!). This recipe is easily doubled, as one jar of peanut butter is equal to two (2) cups - so I often double the recipe because 1) it's peanut butter cookies and 2) I'm too lazy to measure out just one cup of peanut butter.  

It will be very thick and should look like this.  Then use a tablespoon to measure out scoops of dough.  Roll them into balls and place on a cookie sheet about one inch apart.

With a fork, make the traditional criss-cross design as you flatten the balls of dough.  Bake in a 350 degree oven for about 10 minutes.

Now as the cookies cool, make that yummy frosting.  Start by blending peanut butter and butter (or margarine). Add powdered sugar, vanilla and enough milk to get the desired consistency.  Mix until lighter in color and fluffy. 

Now to get that frosting happily sandwiched between the cookies, you can use a knife to spread a glob of frosting on the cookie or use a scoop to portion out equal amounts.  I used my #40 scoop to make generous dollops of frosting on each cookie. If you've gone this far, you might as well keep going with a big 'ol heap of frosting, right?!

Then top off those open-faced peanut butter sandwiches of goodness with another cookie and voila!  Homemade nutter butters!  Hardest part is not eating them all!


Here's the full recipe:

Homemade Nutter Butters

Cookies:

  • 1 cup peanut butter (creamy or chunky)
  • 1 cup sugar
  • 1 egg
  • 1 teaspoon baking soda

Preheat oven to 350 degrees.  In a large bowl, mix together all ingredients until well combined. Using a tablespoon, measure out scoops of dough and roll into balls.  Place them on a cookie sheet about one inch apart.  With a fork, flatten the dough making a crosshatch pattern. Bake cookies until puffed and pale golden, about 10 minutes.  Cool cookies on baking sheet for two (2) minutes then transfer to racks to cool completely.

Frosting:

  • 1 cup butter or margarine
  • 1 cup peanut butter 
  • 2 1/2 cups powdered sugar
  • 1 teaspoon vanilla
  • 3-4 teaspoons milk

In a large bowl, beat together butter and peanut butter and blended and smooth.  Add the powdered sugar one cup at a time.  Add vanilla and mix.  Add enough milk to get the desired consistency then mix until lighter in color and fluffy

Assemble the nutter butters by spreading or scooping a generous amount of frosting onto the bottom of one cookie and topping it off with another.

Yields: 20 nutter butter sandwiches

April 07, 2014 /Libby Harrison
cookies, gluten free, peanut butter
desserts
1 Comment

Powered by Squarespace